When I installed the Iconic One theme to this blog, I knew at once that it would need some important customizations. One of the most important that I added, was a little calendar beside each post title. Many great WordPress themes have a calendar to display the date of a post. Why not give the same touch to Iconic One?
This tutorial will assume basic familiarity with HTML and CSS. Programming skills, especially PHP, are a plus.

Getting started: Theme inspection
First, we have to understand how WordPress puts a page together. When you go to a URL on your blog, WordPress is putting together several PHP files and delivering them to you in one big file. To give you a picture of the parts, TutsPlus has put together a nice visualization:
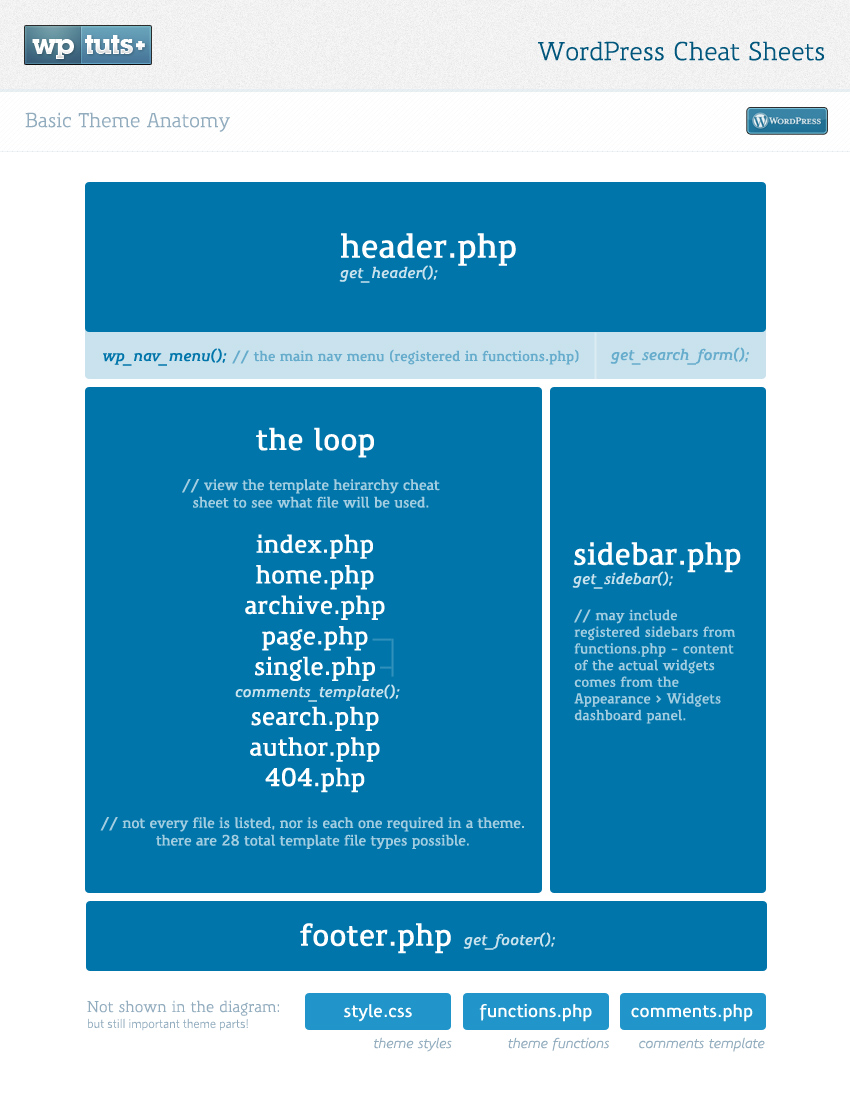
From this, we can be sure that we’re editing the right theme files. Our calendar will probably appear in files like search.php or archive.php, and not in the footer.php.
Finding the files
You’ll need an FTP client for this step, if you already have one. I recommend FileZilla for Windows/Linux, and Cyberduck for Mac.
- Navigate to your
public_htmlfolder. Your webhost should have the details on where this is - Now, go to your blog directory, which should be on the same folder as in the URL. For example, if your blog was at
example.com/blog, there should be ablog/folder in public_html.
If you see three folderswp-content,wp-admin, andwp-includes, then you should be in the right place.
If you’re not sure where your WordPress blog folder is, contact your webhost. - Navigate to:
wp-content/themes/[your-theme].[Your-theme]should be similar to the name of your theme. This is where all the theme files are stored. - Now for the most challenging part: Finding out where exactly to put the calendar. Since each theme is a bit different, the exact file in which you put the calendar code can vary. Try looking first in
single.php, which represents a single blog post. Then try looking for the line of code:<?php the_title(); ?>, as this displays the post title.
If you don’t see it, then chances are that the post title could be in a different theme file.
Putting in the code
The code in itself is pretty compact. Figuring out where exactly to put it is the hard part. I like to put my code right before the div where <?php the_title(); ?> appears. I’ve commented the code below so that you can see exactly what’s going on.
<?php
	$df = 'd M Y'; // e.g '09 Dec 2013'. Date format
	$date = get_the_date($df); // gets the date of the post
	list($day, $month, $year) = explode(' ',$date); // sets day, month, and year of the post
?>
<div class="entry-date"><!-- begins the calendar -->
	<span class="month"><?php echo $month; ?></span>
	<span class="day"><?php echo $day; ?></span>
	<?php if($year != date('Y')) : // shows year if post year is not the current year ?>
	<span class="year"><?php echo $year; ?></span>
	<?php endif; ?>
</div>
<!-- This concludes the mini calendar -->
We’re not quite done yet. This code by itself won’t by any means look pretty. In order to make it look like a calendar we’re going to need some CSS.
Copy and paste the following CSS into your theme’s stylesheet, usually style.css
div.entry-date {
	float: left;
	width: 64px;
	border: 1px solid #16A1E7;
	background-color: #ededed;
	margin: -1px 19px -1px -1px;
}
div.entry-date .month {
	background-color: #16A1E7;
	display: block;
	text-align: center;
	font-weight: bold;
	padding: 2px;
	color: white;
}
div.entry-date .day {
	font-size: 36px;
	text-align: center;
	background-color: #ededed;
	display: block;
	padding: 3px 0px;
	color: rgb(68, 68, 68);
}
div.entry-date .year {
	text-align: center;
	font-size: 11px;
	display: block;
	padding: 2px 0px;
	margin-top: -2px;
	border-top: 1px dotted rgba(22, 163, 233, 0.50);
	background-color: #e6e6e6;
}
You are encouraged to tweak this to your liking, but be careful not to change any of the display: properties. These are what keeps the HTML in line and looking like a calendar.
Testing the theme
Upload your changes via FTP, and hit Refresh. You should now have a beautiful, simple calendar right next to your posts.
hello,
Great! It works 🙂 Thanks a lot!
http://intuitionsoftech.com/